So you’re a blogger or content writer for a website/blog built in WordPress but you want help writing articles with search engine optimization (SEO). You do some research and you find WordPress SEO by Yoast is
considered one of the best (and free). You install the Yoast plug-in
and then go to write a blog post (or page) and you are completely
clueless on how to use it. Well, you’re in luck because this is a
step-by-step tutorial for writing posts/pages with the Yoast plug-in!
Yoast Color System
The WordPress SEO by Yoast plug-in uses a color coding system to rate
how well your blog post (I’ll call everything a post in this tutorial,
but the same applies to pages) is doing on the current keyword. The
system is based on a stop-light, so it’s quite easy to understand.
Grey – You have not selected a keyword yet.
Red – The keyword is ranking poorly.
Orange – Better than red, but still needs improvement.
Yellow – You may want to improve this, but only if it doesn’t hurt your overall post.
Green – Everything looks good!
There are a few places that the SEO ranking is displayed.
The Edit Post sidebar – On the righthand side of the Edit Post screen
in WordPress there is a Publish widget, in this widget the overall page
status is displayed. Your goal is to get a green here.
Live/Preview of Post – When you click “Preview” in the Publish Widget
or once your post is live on your website, you will see the SEO ranking
in your WordPress toolbar at the top of the screen.
Post Listing – As you look at the list of posts you will see that
each one has an SEO color as well as details on the title, meta
description and current keyword.
Page Analysis – This tab of the Yoast plug-in provides details about
how the plug-in has analyzed your post. This screen shot is midway
through writing this post.
Step 1: What are you writing about?
Before you even create a new post, you need to answer the question
“What are you writing about?” In the case of this example, I’m writing a
tutorial on how to use the WordPress SEO plug-in by Yoast. Looking at
the topic I can pick out a few keywords:
WordPress
SEO
Yoast
Tutorial
Those four words are the essence of what I am going to write about.
While it might be tempting to add “how-to” or “plug-in” to the list, you
want this list to be short. You will target all of the keywords in the
list while writing your post. Sometimes your list is just one or two
words long, that’s perfectly fine. I generally recommend once you’ve
decided on your keywords that you write them down as a note to have in
front of you while working on your blog post.
Google vs Yoast SEO Plug-in
A plug-in which can match the robustness of the google search engine
just isn’t going to happen. So, you want to be aware of phrases —
because when targeting phrases you have to match the phrase exactly for
the plug-in to pick them up. Google can handle more diversity than the
Yoast plug-in can (such as “car service” vs “car servicing” would be
correctly handled by google, but not the plug-in).
In general for the plug-in I try to avoid using phrases and instead
use one word keywords. In this example I put WordPress and SEO as
separate keywords, this will make it easier for the plug-in to track
them. Also, it can only do one keyword at a time, so I usually start
with what I consider the most important keyword. For most of this
tutorial I’m using “SEO”.
Step 2: Title, Permalink & Setup Plug-in
Time to create a new WordPress blog post and start writing! Start
with your title, which should be between 40 and 70 characters and use
your keywords in a coherent manner. In this case the name of the plug-in
that I am writing a tutorial is “WordPress SEO by Yoast”, so I include
the name directly and then follow it up with Plug-in and Tutorial. The
post title is “WordPress SEO by Yoast Plug-in Tutorial”.
The permalink will be automatically generated by WordPress after you
finish writing your post title and select the post categories (for a
page you should select if the page has a parent page). The permalink
that was generated from the title and category I selected:
A portion of the permalink is called a “slug”. This is the very last
part, just “wordpress-seo-by-yoast-plug-in-tutorial”. The Yoast plug-in
will tell you that this “slug” is too long. It recommends that the slug
not exceed 40 characters. So I have removed words that I am not
targeting and shortened the slug:
yoast-wordpress-seo-tutorial
Now that you have your title & permalink it’s time to configure
the plug-in on your post to give you some results. Scroll down below the
blog entry window to the WordPress SEO by Yoast plug-in window. Enter
the keyword that you want to start with (in this case SEO). Then enter a
meta description. Your meta description is recommended to be between
120 and 156 characters. You don’t need to make it perfect now, you can
always edit it again later. To start the tutorial, I’m entering an “ok”
meta description which I will update later. Once you’ve entered
everything, click Save Draft in the Publish widget.
Step 3: Understanding the WordPress SEO by Yoast Plug-in
You’ve just saved your draft and now your SEO is reporting as orange
(I’ve specifically set you up with this tutorial to not start with red).
Well, that’s because you have no content yet. So let’s go over to the
Page Analysis tab of the plug-in and see what it is looking for. Red (you want to fix these)
There are 1 words contained in the body copy. This is far too low and should be increased.
For most writing it is recommended to have a minimum of 300 words.
However for certain pages 300 words may not be required. Once you reach
300 words it will become green.
The keyword doesn’t appear in the first paragraph of the copy, make sure the topic is clear immediately.
You should put your keywords in the first paragraph/introduction. If
your first paragraph is a picture instead of text, try to make sure the
keyword is in the picture’s alt text. The Yoast plug-in is actually VERY
picky about this. Orange (you probably want to fix these)
The images on this page are missing alt tags.
There are no images yet. Readers generally like images, so the Yoast
plug-in wants you to add an image. It also suggests once you have added
an image to make sure the keyword is in the alt text. Yellow (consider addressing these)
No outbound links appear in this page, consider adding some as appropriate.
Does your post warrant some outbound links? Since I will be talking
about a plug-in, it is a good idea to have a link to that plug-in. Links
can also help your SEO from search engines.
The meta description is under 120 characters, however up to 156
characters are available. The available space is shorter than the usual
155 characters because Google will also include the publication date in
the snippet.
This is pretty self explanatory. Meta description wants to be between
120 and 156 characters. You should determine if this deserves to be
changed.
The page title contains keyword / phrase, but it does not appear at the beginning; try and move it to the beginning.
If you have multiple keywords only one of them will be able to be at
the beginning. Use your judgement here to make sure that the post title
is readable and understandable by humans.
No subheading tags (like an H2) appear in the copy.
If your post is getting close to that 300 word recommended length,
you probably want to break up the post by using subheadings. H2 tags
(Heading 2 in the drop down menu of the WordPress editor) are generally
recommended to be in the body of a page. Green (congrats, you did a good job!)
The meta description contains the primary keyword / phrase.
Meta description for the tutorial contains the keyword.
The page title is more than 40 characters and less than the recommended 70 character limit.
Page title for the tutorial meets Yoast’s guidelines for title length.
The keyword / phrase appears in the URL for this page.
This is the “slug” mentioned in step 2.
Step 4: Writing content
Now that everything it all setup, we’ll get to the content writing
part of the tutorial! There are a few general guidelines for writing on
the web we’ll start with.
Keep your paragraphs short. Long paragraphs can be challenging to
keep your place as you read. So do your best to keep your paragraphs to
4-5 lines of text.
Keep the reading level easy. Frequently people are multi-tasking
when they are at their computers, so do your best to keep content easy
to read. As you start typing more text into your entry the plug-in will
give your writing a Flesch Reading Ease
score. You will get green in the plug-in by getting a score of 70 or
higher. A score of 60-70 will earn you a yellow. Yellow means a reading
ability equal to high school and green middle school. Unless you know
your readers are technical people, try to get at least a score of 60.
Use standard words. Again, unless you know your audience is very
technical, try to avoid overly technical or obscure words. If you use
them, you may want to provide definitions or links where people can get
more information.
Spell out abbreviations the first time. At the beginning of the
article I spelled out “search engine optimization (SEO)”. This lets
people unfamiliar with the subject understand the abbreviation. You can
even link to a site which provides a definition of the term. New people
can follow the link, those familiar with the subject just ignore it.
Be careful of slang. While much of the internet is in english, not
everyone reading your site will have english as their first language.
Different countries also have unique slang terms. For example “the boot”
can refer to the trunk of a car in England.
Spelling is important. For this tutorial and all blog posts we use a
WebKit based browser (Google Chrome or Apple Safari). The reason is,
WebKit browsers check spelling as you type in both single line text
fields (like your post title) and multi-line text fields (like the post
content). So you take the help available from WebKit browsers, because
I’ve seen major blogs have typos in their titles and it’s rather
embarrassing.
Now the moment you’ve waited for in the tutorial, writing! Go ahead
and write your first couple paragraphs of text for your WordPress blog
post.
Step 5: Reviewing Your SEO As You Go
Great job! You’ve got some content to your post. Perhaps even an
image or two. So let’s review how your SEO is doing. The Yoast plug-in
has given our tutorial an overall score of green at this point. Once you
have the majority of items done, Yoast will score you as green. Here’s a
look at this post’s introduction and first section (everything before
Step 1): Red (we should improve):
You have not used your keyword / keyphrase in any subheading (such as an H2) in your copy.
As we continue to write the post, we should be sure to use our keywords at least once in a subheading. Yellow (we should consider these):
The page title contains keyword / phrase, but it does not appear at the beginning; try and move it to the beginning.
A different one of our keywords is the first on the page. So we don’t do anything about this. Green (doing well!):
The copy scores 74.4 in the Flesch Reading Ease test, which is considered fairly easy to read.
This is an entry we didn’t have before. A score greater than 70 is
our goal most of the time, as that means middle school reading level.
This is important as our readers may not speak english as their first
language or they may be from another country and be accustomed to
different grammar.
The keyword / phrase appears in the URL for this page.
This was the “slug” from step 1.
This page has 1 outbound link(s).
Outbound links are good — it shows that you play well with others.
The images on this page contain alt tags with the target keyword / phrase.
We’ve used the keyword in our alt tag on our image.
The keyword density is 2.17%, which is great, the keyword was found 7 times.
A keyword density from 1-4% is our goal. So 2% is doing well.
In the specified meta description, consider: How does it compare to the competition? Could it be made more appealing?
We’ve made our meta description long enough, the plug-in is reminding
us that we may want to double-check it before we publish our post.
The meta description contains the primary keyword / phrase.
This is our meta description from step 1.
There are 322 words contained in the body copy, this is greater than the 300 word recommended minimum.
Good work, we’ve written enough content in this tutorial! (It’s our job to make sure it is useful.)
The page title is more than 40 characters and less than the recommended 70 character limit.
Our page title for the tutorial is a good length.
The keyword appears in the first paragraph of the copy.
It is good to make our point up front.
Step 6: Checking Other Keywords
You’ve written your post, periodically checking your SEO as you go by
saving your draft, now it’s time to see if you remembered to include
the other keywords that you are targeting. Go to your plug-in and change
the Focus Keyword to one of your other keywords. Then press Save Draft
in the Publish widget. The plug-in will now update to your new keyword.
Frequently what will happen is that your keyword density will be a
little low (or possibly even too high). You can usually look back over
the post and find a couple of places where you could add in the keyword
(or remove it if too high). I’ve already tweaked this article, so I will
just show you the screen shots for my 4 keywords.
While reviewing my post I also noticed that I used the keyword
plug-in quite a bit. So I’ve gone ahead and added that to my list of
keywords for the tutorial! This is actually a pretty common occurrence
to find a new keyword or two as you write. In this case, I’ve updated
the WordPress slug to include my new keyword. My new slug is:
Seotipsku kali ini akan berbagi bagaimana cara membuat category post list blogspot berdasarkan label, atau membuat list postingan per kategori/label secara otomatis berdasarkan postingan terbaru, tentunya akan memudahkan pembaca untuk melihat sitemap daftar isi dari blogspot.
Cara Membuat Category Post List Blogspot :
Langkahnya :
Go to Layout Design > Page Elements/Dashboard
Pilih tata Letak
Click Add A Widget.
In Add A Widget window, select HTML/Javascript.
Masukan Nama Kategori yang ingin dibuat.
Copy the code below and paste it inside the content box.
Click Save.
<!-- Recent Posts by Label Start -->
<!-- code by BloggerSentral.com -->
<script type="text/javascript">
function recentpostslist(json) {
 document.write('<ul>');
 for (var i = 0; i < json.feed.entry.length; i++)
 {
    for (var j = 0; j < json.feed.entry[i].link.length; j++) {
      if (json.feed.entry[i].link[j].rel == 'alternate') {
        break;
      }
    }
var entryUrl = "'" + json.feed.entry[i].link[j].href + "'";//bs
var entryTitle = json.feed.entry[i].title.$t;
var item = "<li>" + "<a href="+ entryUrl + '" target="_blank">' + entryTitle + "</a> </li>";
 document.write(item);
 }
 document.write('</ul>');
 }
</script>
<script src="YOUR_BLOGSPOT_URL/feeds/posts/default/-/YOUR_LABEL?max-results=YOUR_MAX_RESULT&alt=json-in-script&callback=recentpostslist"></script>
<!-- Recent Posts by Label End -->
Langkah berikutnya :
Ganti YOUR_BLOGSPOT_URL dengan nama blogspot kamu misalnya http://seotipsku.blogspot.com
Ganti YOUR_LABEL dengan link label kamu misalnya Tips20%SEO.
Ganti YOUR_MAX_RESULT dengan jumlah post yang ingin ditampilkan misalnya 5
Alexa Traffic Rank akan drastis meningkat jika pengunjung blog anda ramai, itu salah satu kunci untuk meningkatkan Alexa rank tersebut,
Selain pengunjung yang banyak, kita juga harus mengupdate blog secara
rutin dan berkala, misalnya dengan membuat postingan 3x dalam seminggu,
nah, pertanyaannya adalah
Bagaimana Cara meningkatkan Pengunjung Blog ?
Inti dari permasalahannya adalah cara untuk meningkatkan blog, jika
blog ramai maka semua akan terjawab, Alexa Rank akan meningkat dengan
otomatis, Blog menjadi lebih SEO friendly,
Berikut Tips SEO Killer untuk Meningkatkan Pengunjung Blog
Mendaftarlah di Situs Auto Traffic Exchange, selain kita mendapatkan
pengunjung bisa juga untuk ajang promosi blog, bisnis dan yang paling
penting untuk meningkatkan Alexa rank blog atau web anda,
Auto Traffic Exchange Terbaik Indonesia ?
Dimana Situs exchange Terbaik Indonesia?
Anda bisa mendaftar disini www.TrafikID.com
Silahkan mendaftar di situs Exchange tersebut secara GRATIS,
Berikut referensi tentang Auto Traffic Exchange Terbaik Indonesia yang sudah sering kami bahas,
Cara ini merupakan cara yang paling umum digunakan. Membuat tautan dari
satu posting ke artikel posting lama dengan achor text yang kita
pilih. Google SEO Starter Guide memberi petunjuk cara membuat text link yang baik.
Pilih teks yang deskriptif - Gunakan teks tautan yang dapat
menggambarkan halaman posting yang dituju. Hindari menggunakan teks
tautan yang terlalu umum seperti klik di sini. Kata klik di sini tidak
akan menggambarkan isi konten pada halaman yang ditautkan.
Teks tautan ringkas - Usahakan tulis teks yang pendek tapi
deskriptif, biasanya beberapa kata atau frasa pendek. Hindari menulis
teks tautan yang panjang, seperti berupa kalimat panjang atau paragraf.
Buatlah format tautan yang mudah terlihat. Saya pernah mendapati
blog yang kontennya bagus dan sangat membantu. Namun ada ketidakpuasan
ketika saya melihat warna teks tautan yang nyaris mirip dengan warna
teks konten artikel posting. Sayang sekali, pikirku dalam hati. Jika
tidak jeli, pembaca akan terkecoh sehingga tidak meng-klik tautan
tersebut.
Jangan menggunakan teks tautan yang tidak sesuai dengan konten
halaman yang ditautkan. Ingat, google pintar menilai kualitas link
tautan antar posting.
Hindari menggunakan tautan berupa alamat url. Satu hal, Anda dapat
menggunakan tautan berupa url jika tautan tersebut digunakan untuk
mempromosikan situs web yang masih baru. Ini hanya saran dari google.
Teks tautan berupa keyword pada posting yang terkait. Seperti yang
saya katakan di atas, jangan gunakan teks yang terlalu umum seperti
klik di sini. Misalnya seperti ini, saya berencana membuat tautan pada
posting lama tentang membuat banner animasi. Maka teks tautan yang saya
buat ke posting tersebut adalah banner animasi karena keyword posting
tersebut saya atur banner animasi, bukan "klik di sini".
Sebagai contoh, anda bisa melihat pada homepage blog saya. Setiap artikel saya potong dengan teks read more.
Teks ini mengarah pada link artikel yang sedang anda baca. Di akhir
setiap posting, saya juga menyertakan posting-posting terkait dengan
widget related posts.
Link pada sidebar
Pasti anda sering menemukan widget ini pada blog dan situs web yang
anda kunjungi. Salah satunya pada sidebar blog saya. Ada yang membuat top posts, good articles
dan lain-lain, dengan memasukkan beberapa tautan (link) artikel
posting blognya yang paling ramai dikunjungi. Ada pula yang menampilkan
beberapa tautan mengarah ke artikel posting terbaru atau recent posts dan top komentator cloud
dengan widget dan kode script tertentu. Tautan ini sangat berguna bagi
pengguna blog. Selain navigasi semakin baik, juga membuat tampilan
blog terlihat lebih prima dan membantu mesin cari untuk meng-index
semua artikel posting blog.
Link pada menu navigasi horisontal
Google lebih menyenangi tautan yang langsung tertuju pada halaman
posting. Ada juga pemilik blog yang membuat tautan ke label posting.
Hal ini tidak dianjurkan oleh google. Kalau Anda melihat menu
horinsontal pada blog saya, tautan tersebut saya buat langsung menuju
halaman posting dan bukan menuju label posting. Silahkan baca cara membuat navigasi horizontal menu. Selain itu, ada lagi namanya navigasi breadcrumb berupa link navigasi di atas judul artikel yang sedang dibaca.
Ada kalanya terjadi perubahan isi artikel yang terpengaruh oleh kondisi
saat ini. Misalnya Anda membuat artikel tentang tutorial blogger pada 3
bulan yang lalu, namun seiring waktu berjalan ternyata blogger
mengalami perubahan pada penambahan layanan dan fitur baru blogger atau
bisa saja mengurangi fitur yang mereka rasa tidak perlu digunakan.
Perubahan ini otomatis akan berpengaruh pada artikel lama yang menjadi
tidak relevan lagi pada saat ini. Untuk mengatasinya, Anda dapat
membuat posting baru yang sama dengan posting lama dengan tambahan
judul update yang kontennya sudah disesuaikan dengan layanan fitur
blogger sekarang. Sedangkan pada posting lama, Anda dapat membuat
tautan ke posting baru tersebut yang sudah disesuaikan dengan kondisi
saat ini.
Pada kesempatan kali ini, saya mencoba sharing tentang bagaimana membuat internal link sebagai salah satu upaya untuk mengoptimalkan Optimasi SEO Onpage. Saya yakin di antara Anda pasti sudah paham dengan kekuatan inbound link dari situs lain atau halaman web yang relevan dengan niche dalam hal page rank atau kepopuleran link. Dan tentunya Google akan sangat memperhitungkan link-link tersebut ketika menentukan page rank atau authority. Yang tidak sepenuhnya benar adalah bahwa link-link tersebut merupakan satu-satunya pemegang peranan penting dalam SEO situs kita.
Link-link internal yang kontekstual juga sama pentingnya. Internal Link membantu semua halaman terindeks oleh search engine dengan "mengingatkan" spider search engine bahwa halaman lama kita masih eksis dan layak untuk dinilai. Ini dapat meningkatkan kegunaan blog kita dengan baik dan membantu kita keluar dari penjara Google Sandbox.
Menaikkan Page View. Membuat tautan ke posting lama, kemungkinan besar akan membawa pembaca ke halaman posting lama. Pembaca akan membuka lebih dari satu halaman saja, artinya hit page view meningkat. Manfaat lainnya memberikan kesan blog Anda lebih hidup dengan membuat tautan yang berhubungan pada posting lain. Ada peluang, pembaca akan meninggalkan komentar pada halaman lain yang dia baca. Meningkatkan kepercayaan pembaca pada blog Anda dan kemungkinan akan menjadi pembaca setia. Kemungkinan lainnya adalah, pembaca akan tidak segan-segan untuk berlangganan artikel dari blog Anda.
Memuaskan Pembaca Blog. Internal link merupakan navigasi yang baik bagi pembaca blog untuk menuju posting-posting terkait. Satu artikel posting jika didukung oleh artikel lainnya akan semakin menguatkan fakta pada posting tersebut. Pembaca pasti akan mencari alasan kenapa dia harus membaca posting tersebut, adakah posting lain pada blog yang mendukungnya.
SEO (Search Engine Optimization). Membuat tautan ke posting lain akan mengoptimalkan proses index mesin cari pada seluruh halaman blog yang saling bertautan. Secara otomatis mesin cari seperti google dan yahoo akan membaca konten posting pada link (tautan) yang ada. Link dari blog lain yang mengarah ke blog Anda (back link) memang sangat berpengaruh bagi peringkat blog (pagerank). Namun link pada posting yang satu ke posting yang lain juga akan menaikkan peringkat halaman blog pada search engine. Kita dapat meningkatkan pagerank halaman tertentu pada blog dengan membuat banyak tautan posting yang berkualitas menuju halaman tersebut. Misalnya Anda punya satu posting yang menjadi andalan blog. Nah, untuk mengoptimalkannya pada hasil pencarian mesin cari seperti Google, Anda bisa membuat tautan dari posting lain yang mengarah ke posting andalan tersebut.
SEO google starting guide sangat menyarankan internal link ini. Mengapa Anda tidak melakukannya jika masih mengandalkan Google sebagai mesin pencari Anda
Penting :
Membuat tautan dengan konsep internal link juga tidak sembarangan. Saya belajar dari aturan yang disarankan oleh google. And why is that? Karena google adalah guru terbaik untuk belajar. Anda ingin apa, tanyakan pada google dan dia akan menjawab.
Demikian tadi penjelasan singkat saya mengenai internal link dan dari uraian diatas Anda bisa menyimpulkan sendiri bagaimana fungsi dan peran sebuah internal link dalam sebuah blog. Nah, sekarang waktunya Anda untuk menyediakan waktu guna membuat tautan antara posting yang satu dengan yang lainnya. Yang perlu diingat dan diperhatikan disini adalah buatlah tautan dengan konten posting yang masih berkaitan dan relevan.
Semoga bermanfaat..!
Dari Mana Dapat Site Link Alexa? Ini semula menjadi pertanyaan saya, selanjutnya saya googling yang kemudian saya share disini. Terkait untuk mendapatkan sitelink yang berkualitas tentunya bisa didapatkan dari website atau forum nofollow maupun dofollow sehingga secara tidak langsung dapat mendongkrak rangking web kita.
Mungkin bagi sobat Blogger ada yang belum tau tentang Dari mana anda dapatkan Site Link. Saya juga masih Gaptek, tapi saya mau mencoba menjelaskan sedikit tentang dari mana anda dapatkan Site Link atau Link In.
Berikut beberapa penjelasan yang harus anda baca agar anda tau Dari Mana Mendapatkan Link In atau Site Link Alexa:
Alexa hanya menghitung link dalam jumlah situs yang terhubung, dan bukan jumlah halaman. Artinya Alexa Hanya menghitung satu link dari satu situs. Jadi misalkan di satu situs tersebut ada banyak link anda, maka Alexa hanya menghitung satu Link saja.
Alexa hanya memperbarui jumlah situs yang terhubung atau Site Link dalam satu kali per bulan untuk semua situs.
Alexa tidak menghitung link dari koleksi link atau yang serupa. Jadi tidak lain yaitu jika tukeran link itu tidak di hitung Site Link oleh situs Alexa.
Alexa merangkak dari web difokuskan pada halaman yang memiliki lalu lintas terukur. Jika kita tidak bisa mengukur lalu lintas ke suatu halaman web, maka kecil kemungkinan untuk dapat dijelajahi dan link pada halaman tersebut tidak akan dihitung. Salah satu cara agar Alexa bisa mengetahui bahwa itu adalah Site Link yaitu dengan menggunakan Alexa Toolbar yang diinstal dan diaktifkan pada browser Anda.
Perlu anda ketahui bahwa trafik blog anda itu tidak mempengaruhi Site Link Blog anda.
Nah itu dia sobat, penjelasan singkat Dari mana Site Link Alexa Didapatkan. Dan dari penjelasan di atas, anda sudah tau Cara Mendapatkan Link In Alexa.
Tujuan kita berselancar di dunia maya adalah untuk mendapatkan informasi yang mana didapat semua dengan gratis melalui internet. Blog sebagai sarana penyedia informasi harus memiliki konten yang berkualitas yang tentunya dapat memberikan manfaat buat pengunjung yang membacanya.
Berikut Seotipsku mencoba sharing seperti apakah kriteria konten blog yang berkualitas itu?
1. Bermanfaat
Inti dari konten blog yang berkualitas adalah dapat memberikan manfaat kepada pembacanya. Pembaca rela menghabiskan waktu sekian menit untuk membaca konten yang telah Anda terbitkan dengan harapan mereka bisa menemukan manfaat untuk menambah wawasan atau sebagai solusi atas permasalahan yang dihadapi. Jika konten blog yang ditulis ternyata mampu menyelesaikan masalah pembaca yang menyimaknya, saya yakin mereka pasti akan segera jatuh cinta dengan blog yang Anda punya.
2. Mudah dipahami pembaca
Sebuah konten blog yang baik harus dikemas agar mudah dipahami oleh pembacanya. Anda bisa menambahkan contoh dan perbandingan ketika menulis sebuah konten, sehingga pembaca lebih cepat mengerti maksud yang disampaikan. Selain itu, cara agar konten blog mudah dipahami pembaca yaitu mengemasnya secara singkat dan tidak bertele-tele, menggunakan gaya bahasa komunikatif, serta menggunakan tata bahasa yang baik dan tidak terkesan alay.
3. Terstruktur.
Konten blog harus disusun secara hierarkis atau terstruktur dari tahap paling awal sampai terakhir agar mudah dipraktikan. Misal Anda membuat konten tutorial membuat layang-layang. Ketika konten tersebut disusun secara runtut dan rinci dari proses persiapan alat dan bahan serta cara membuat dari awal hingga selesai maka pengunjung yang membacanya pun akan cepat paham dan mudah untuk mempraktikannya.
4. Sumber referensi terpercaya.
Konten blog juga harus dibuat berdasarkan sumber referensi yang terpercaya, sehingga kebenaran atas informasi yang disampaikan tidak diragukan lagi. Anda bisa mengambil rujukan dari buku, portal online, hingga pengalaman pribadi yang pernah dialami.
5. Memuat banyak materi pokok.
Semakin banyak materi yang dimuat dalam konten blog maka kualitasnya akan semakin bagus. Pembaca akan semakin paham terhadap sebuah topik yang dibahas karena banyaknya materi yang disampaikan akan semakin memperluas wawasan mereka.
6. Tidak termakan waktu.
Konten blog yang baik juga perlu memiliki kandungan materi yang tidak lekang oleh waktu. Maksud saya begini, ketika Anda menulis informasi tentang cara membuat desain gambar poster digital maka informasi tersebut tetap bisa digunakan oleh banyak orang di waktu beberapa tahun ke depan karena tidak terbentur kesalahan akibat semakin berkembangnya inovasi dari cara untuk membuat desain gambar poster digital yang dimaksud, seperti berkembangnya aplikasi yang digunakan, motif, dan trik dalam membuatnya. Konten blog yang tidak termakan waktu sangat bermanfaat untuk dijadikan sebagai artikel pilar yang dapat mengangkat kualitas blog Anda secara keseluruhan. Hal ini karena konten blog banyak dicari dan dibaca banyak orang sehingga nama blog Anda pun semakin dikenal banyak orang.
Apakah konten blog yang telah Anda buat sudah memenuhi semua kriteria di atas? Jika belum, coba lah untuk terus berkarya dan berinovasi karena saat ini saya dan Anda sama-sama masih belajar. Ayo, silakan beri tanggapan dan masukan untuk kemajuan blog kita. Salam Blogger...
You can do a find and replace for text or html code on a post or page across a whole WordPress site by using the mysql database that the site stores all its data in.
First up you need to connect to the database, if you have a cPanel/Plesk style hosting typically you will have an option to connect to the database via phpmyadmin.
Connect to your WebHost
Connect to your WebHost
Select your WordPress database
If you have multiple databases and don’t know which one, check the database name in the wp-config.php file which is stored in your webroot; htdocs or public_html.
Select the wp_posts table
Select the wp_posts table
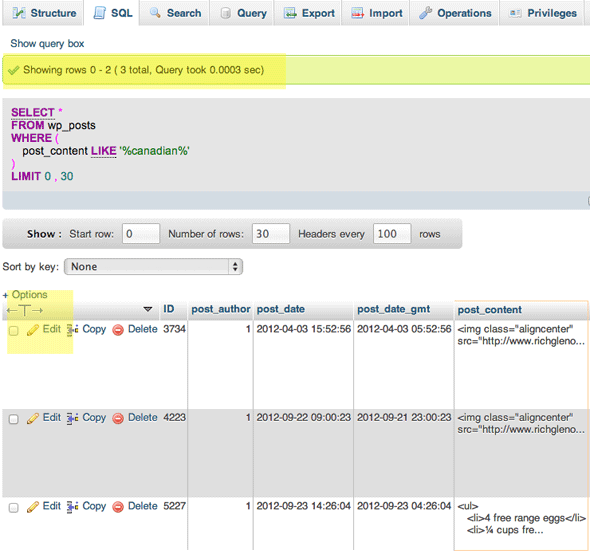
To Search For a Text Query Only
Select SQL Tab and add in the Search Query SQL
SELECT * FROM wp_posts WHERE (post_content LIKE '%TEXT-TO-FIND-GOES-HERE%');
Click ‘Go’
To edit the post, click on edit and do what needs to be done – if you edit the text it will be updated in your WordPress post.
To Search and Replace For a Text String
Select SQL Tab and add in the Search and Replace SQL Code
So here switch to the ‘SQL’ tab add in the code below and click on the ‘Go’ button.
UPDATE wp_posts SET post_content = REPLACE ( post_content, 'text to find here', 'text to replace here');
So with the SQL code you put your text between the single quotes for what you are finding and what you are replacing these are separated by the comma.
See the Results
Doing it via Command Line
This can also be easily done via the command line, you just need to start a mysql session:
mysql -u username -ppassword
use mywordpress_table;
UPDATE wp_posts SET post_content = REPLACE ( post_content, 'text to find here', 'text to replace here');
WP Minify is one of the best plugins that helps to speed up WordPress by minifying all CSS and JavaScript Files. If you are looking to optimize WordPress for Google Page Speed then the very first step you have to follow is minify all JS, CSS files in your WordPress Themes. This way the number of HTTP requests can be limited and lighter version of scripts will be loaded on all pages of your blog. Minify engine is integrated to W3 Total cache plugin also.
Speed Up WordPress Using WP Minify Plugin
This plugin catches all available CSS, JavaScript files in WordPress
page and passes them to minify engine. All these files will be minified,
compressed and combined (if option is enabled) by minify engine before
serving them in Header or Footer of you theme.
It easily integrates minify engine into WordPress and minifies JS, CSS in a fly.
Include or exclude internal and external Javascript, CSS files into WP Minify.
Minified files will be combined and can be placed in Header or Footer.
Duplicate sources will be identified and removed automatically.
Debug tool is also available that helps to debug issues easily.
Although many other plugins can do the similar job, but none of them
are not as precise as WP Minify. Just install it and you surely will
notice a huge difference in loading speed. Still, if you are not
satisfied with the performance, you can deactivate WP Minify in 2 simple
steps. Find out which WordPress Plugins Are Slowing Down your blog.
How to install and Configure WP Minify Plugin
If you already know how to install a WordPress plugin, then proceed further to the WP Minify Plugin Page
in Official Repo. After done with the installation, you need to
configure it by using the available options in admin console. Go to Settings > WP Minify
page and you can see some basic options there. Clicking on Advanced
Options will expand the admin pane and displays more settings fields. Step 1: General Configuration
Enable all minifications i.e Javascript, CSS and HTML by selecting
the check boxes and saving the settings. By doing this, all the JS, CSS
files will be compressed by removing unnecessary spaces and comment
lines. Step 2: Local Files Minification
You can include or exclude any JS, CSS files by inserting the link in
these fields. Just enter one URL per line and click on save settings
button. Files will be included or excluded respectively and this is a
very handy option. Step 3: Non-Local Files Minification
Apart from internal links you can also minify files from external
sources also. In this example, I included CSS files on NRelate WordPress
plugin and both these CSS files will be minified automatically. You can
also see one JS file is also included in the above text area. Step 4: Advanced Options
Advanced options include Cache settings , Pretty URL preference etc
useful options to make the most out of WP Minify plugin. It is not
recommended to place JS files in footer, as doing so will result in
crashing of theme or plugins. This way we can Speed Up WordPress Using WP Minify Plugin and
share you experience in using it by dropping your valuable comment here.
Minify sebuah kata yang sering disebut sebut oleh
berbagai kalangan blogger, dimana minify adalah meringkaskan atau
membuat sebuah konten website menjadi lebih ringan karena ukurannya akan
berkurang. Atau istilah saya menghapus beberapa whitespace atau konten
yang tidak diperlukan sehingga ukuran output website ke visitor akan dimuat lebih cepat.
Tentunya kalau whitespace yang ada tersebut dihilangkan maka secara otomatis ukuran output html dari regenerate CMS atau website akan berkurang. Dan minify tidak akan menghapus sebuah spasi, yang dihapus contohnya adalah :
- tab dan perintah Enter , dimana pada Source code command tersebut tidak akan diindahkan sebagai Script tag HTML, command tab atau enter hanya akan memberikan kesan rapi pada source code saja.
Cara Minify Website Yang Menggunakan Wordpress Secara Manual
Taruh script berikut sebelum code <!DOCTYPE html> atau paling atas sebelum kode dimulai :
Dan taruh code berikut dibagian akhir paling bawah Script sahabat.
    <?php
    ob_end_flush();
    ?>
Pada WordPress , caranya hanya menambahkan code pertama pada header.php code dimulau , atau taruh di bagian atas sendiri , dan kode kedua taruh di footer.php bagian paling bawah sendiri atau akhir dari script , di Theme wordPress sahabat.
Dengan catatan cara ini hanya berhasil untuk scipt yang berbasis PHP LANGUAGE, dan hanya bekerja untuk inline script saja, ..
Sedikit tips untuk sahabat Seotipsku, mungkin sahabat sering menjumpai php comment atau comment javascript , yang antara lain menggunakan :
// ini comment
atau
/* comment */
nah saya menyarankan hindari tag comment dengan menggunakan // , lebih baik menggunakan tag /* isi comment */ disini adalah untuk menghindari rancunya script sahabat apabila menggunakan tag // dan dengan menggunakan tag comment ini kalau sahabat menempatkan script yang seharusnya bekerja pada baris yang sama dibelakang / sebelah kanannya tag comment , wal hasil skrip tidak akan bekerja alais yang ada dibelakang comment akan ikut dihitung sebagai konten comment (php / javascript etc. ).
Dan apabila ada comment tag pada website sahabat ( javascript ) yang terdapat comment tag // coba ubah menjadi /* */ , atau hapus saja.


.jpg)


