So you’re a blogger or content writer for a website/blog built in WordPress but you want help writing articles with search engine optimization (SEO). You do some research and you find WordPress SEO by Yoast is
considered one of the best (and free). You install the Yoast plug-in
and then go to write a blog post (or page) and you are completely
clueless on how to use it. Well, you’re in luck because this is a
step-by-step tutorial for writing posts/pages with the Yoast plug-in!
Yoast Color System
The WordPress SEO by Yoast plug-in uses a color coding system to rate
how well your blog post (I’ll call everything a post in this tutorial,
but the same applies to pages) is doing on the current keyword. The
system is based on a stop-light, so it’s quite easy to understand.
Grey – You have not selected a keyword yet.
Red – The keyword is ranking poorly.
Orange – Better than red, but still needs improvement.
Yellow – You may want to improve this, but only if it doesn’t hurt your overall post.
Green – Everything looks good!
There are a few places that the SEO ranking is displayed.
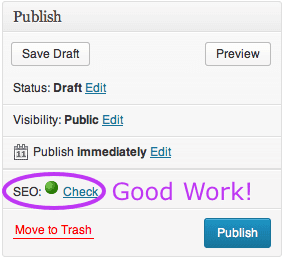
The Edit Post sidebar – On the righthand side of the Edit Post screen
in WordPress there is a Publish widget, in this widget the overall page
status is displayed. Your goal is to get a green here.
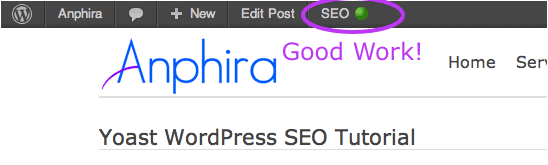
Live/Preview of Post – When you click “Preview” in the Publish Widget
or once your post is live on your website, you will see the SEO ranking
in your WordPress toolbar at the top of the screen.
Post Listing – As you look at the list of posts you will see that
each one has an SEO color as well as details on the title, meta
description and current keyword.
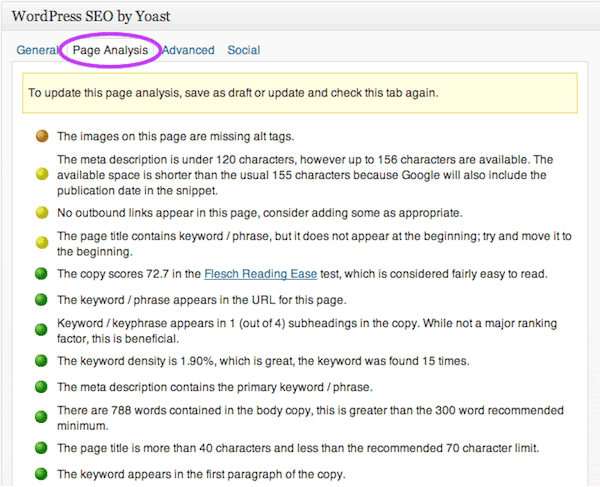
Page Analysis – This tab of the Yoast plug-in provides details about
how the plug-in has analyzed your post. This screen shot is midway
through writing this post.
Step 1: What are you writing about?
Before you even create a new post, you need to answer the question
“What are you writing about?” In the case of this example, I’m writing a
tutorial on how to use the WordPress SEO plug-in by Yoast. Looking at
the topic I can pick out a few keywords:
WordPress
SEO
Yoast
Tutorial
Those four words are the essence of what I am going to write about.
While it might be tempting to add “how-to” or “plug-in” to the list, you
want this list to be short. You will target all of the keywords in the
list while writing your post. Sometimes your list is just one or two
words long, that’s perfectly fine. I generally recommend once you’ve
decided on your keywords that you write them down as a note to have in
front of you while working on your blog post.
Google vs Yoast SEO Plug-in
A plug-in which can match the robustness of the google search engine
just isn’t going to happen. So, you want to be aware of phrases —
because when targeting phrases you have to match the phrase exactly for
the plug-in to pick them up. Google can handle more diversity than the
Yoast plug-in can (such as “car service” vs “car servicing” would be
correctly handled by google, but not the plug-in).
In general for the plug-in I try to avoid using phrases and instead
use one word keywords. In this example I put WordPress and SEO as
separate keywords, this will make it easier for the plug-in to track
them. Also, it can only do one keyword at a time, so I usually start
with what I consider the most important keyword. For most of this
tutorial I’m using “SEO”.
Step 2: Title, Permalink & Setup Plug-in
Time to create a new WordPress blog post and start writing! Start
with your title, which should be between 40 and 70 characters and use
your keywords in a coherent manner. In this case the name of the plug-in
that I am writing a tutorial is “WordPress SEO by Yoast”, so I include
the name directly and then follow it up with Plug-in and Tutorial. The
post title is “WordPress SEO by Yoast Plug-in Tutorial”.
The permalink will be automatically generated by WordPress after you
finish writing your post title and select the post categories (for a
page you should select if the page has a parent page). The permalink
that was generated from the title and category I selected:
A portion of the permalink is called a “slug”. This is the very last
part, just “wordpress-seo-by-yoast-plug-in-tutorial”. The Yoast plug-in
will tell you that this “slug” is too long. It recommends that the slug
not exceed 40 characters. So I have removed words that I am not
targeting and shortened the slug:
yoast-wordpress-seo-tutorial
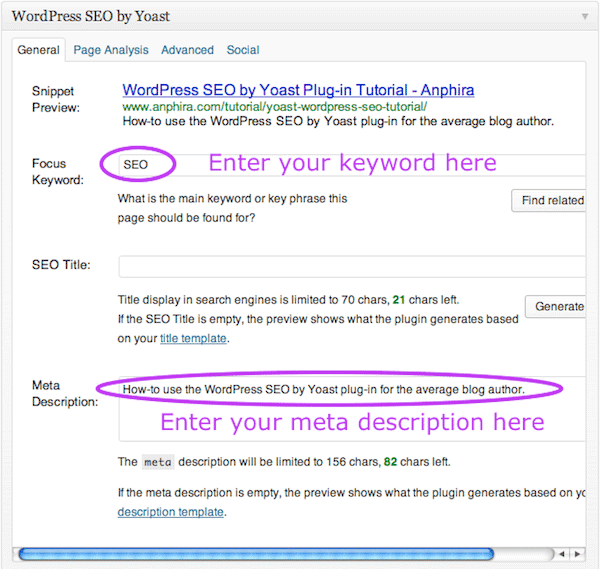
Now that you have your title & permalink it’s time to configure
the plug-in on your post to give you some results. Scroll down below the
blog entry window to the WordPress SEO by Yoast plug-in window. Enter
the keyword that you want to start with (in this case SEO). Then enter a
meta description. Your meta description is recommended to be between
120 and 156 characters. You don’t need to make it perfect now, you can
always edit it again later. To start the tutorial, I’m entering an “ok”
meta description which I will update later. Once you’ve entered
everything, click Save Draft in the Publish widget.
Step 3: Understanding the WordPress SEO by Yoast Plug-in
You’ve just saved your draft and now your SEO is reporting as orange
(I’ve specifically set you up with this tutorial to not start with red).
Well, that’s because you have no content yet. So let’s go over to the
Page Analysis tab of the plug-in and see what it is looking for. Red (you want to fix these)
There are 1 words contained in the body copy. This is far too low and should be increased.
For most writing it is recommended to have a minimum of 300 words.
However for certain pages 300 words may not be required. Once you reach
300 words it will become green.
The keyword doesn’t appear in the first paragraph of the copy, make sure the topic is clear immediately.
You should put your keywords in the first paragraph/introduction. If
your first paragraph is a picture instead of text, try to make sure the
keyword is in the picture’s alt text. The Yoast plug-in is actually VERY
picky about this. Orange (you probably want to fix these)
The images on this page are missing alt tags.
There are no images yet. Readers generally like images, so the Yoast
plug-in wants you to add an image. It also suggests once you have added
an image to make sure the keyword is in the alt text. Yellow (consider addressing these)
No outbound links appear in this page, consider adding some as appropriate.
Does your post warrant some outbound links? Since I will be talking
about a plug-in, it is a good idea to have a link to that plug-in. Links
can also help your SEO from search engines.
The meta description is under 120 characters, however up to 156
characters are available. The available space is shorter than the usual
155 characters because Google will also include the publication date in
the snippet.
This is pretty self explanatory. Meta description wants to be between
120 and 156 characters. You should determine if this deserves to be
changed.
The page title contains keyword / phrase, but it does not appear at the beginning; try and move it to the beginning.
If you have multiple keywords only one of them will be able to be at
the beginning. Use your judgement here to make sure that the post title
is readable and understandable by humans.
No subheading tags (like an H2) appear in the copy.
If your post is getting close to that 300 word recommended length,
you probably want to break up the post by using subheadings. H2 tags
(Heading 2 in the drop down menu of the WordPress editor) are generally
recommended to be in the body of a page. Green (congrats, you did a good job!)
The meta description contains the primary keyword / phrase.
Meta description for the tutorial contains the keyword.
The page title is more than 40 characters and less than the recommended 70 character limit.
Page title for the tutorial meets Yoast’s guidelines for title length.
The keyword / phrase appears in the URL for this page.
This is the “slug” mentioned in step 2.
Step 4: Writing content
Now that everything it all setup, we’ll get to the content writing
part of the tutorial! There are a few general guidelines for writing on
the web we’ll start with.
Keep your paragraphs short. Long paragraphs can be challenging to
keep your place as you read. So do your best to keep your paragraphs to
4-5 lines of text.
Keep the reading level easy. Frequently people are multi-tasking
when they are at their computers, so do your best to keep content easy
to read. As you start typing more text into your entry the plug-in will
give your writing a Flesch Reading Ease
score. You will get green in the plug-in by getting a score of 70 or
higher. A score of 60-70 will earn you a yellow. Yellow means a reading
ability equal to high school and green middle school. Unless you know
your readers are technical people, try to get at least a score of 60.
Use standard words. Again, unless you know your audience is very
technical, try to avoid overly technical or obscure words. If you use
them, you may want to provide definitions or links where people can get
more information.
Spell out abbreviations the first time. At the beginning of the
article I spelled out “search engine optimization (SEO)”. This lets
people unfamiliar with the subject understand the abbreviation. You can
even link to a site which provides a definition of the term. New people
can follow the link, those familiar with the subject just ignore it.
Be careful of slang. While much of the internet is in english, not
everyone reading your site will have english as their first language.
Different countries also have unique slang terms. For example “the boot”
can refer to the trunk of a car in England.
Spelling is important. For this tutorial and all blog posts we use a
WebKit based browser (Google Chrome or Apple Safari). The reason is,
WebKit browsers check spelling as you type in both single line text
fields (like your post title) and multi-line text fields (like the post
content). So you take the help available from WebKit browsers, because
I’ve seen major blogs have typos in their titles and it’s rather
embarrassing.
Now the moment you’ve waited for in the tutorial, writing! Go ahead
and write your first couple paragraphs of text for your WordPress blog
post.
Step 5: Reviewing Your SEO As You Go
Great job! You’ve got some content to your post. Perhaps even an
image or two. So let’s review how your SEO is doing. The Yoast plug-in
has given our tutorial an overall score of green at this point. Once you
have the majority of items done, Yoast will score you as green. Here’s a
look at this post’s introduction and first section (everything before
Step 1): Red (we should improve):
You have not used your keyword / keyphrase in any subheading (such as an H2) in your copy.
As we continue to write the post, we should be sure to use our keywords at least once in a subheading. Yellow (we should consider these):
The page title contains keyword / phrase, but it does not appear at the beginning; try and move it to the beginning.
A different one of our keywords is the first on the page. So we don’t do anything about this. Green (doing well!):
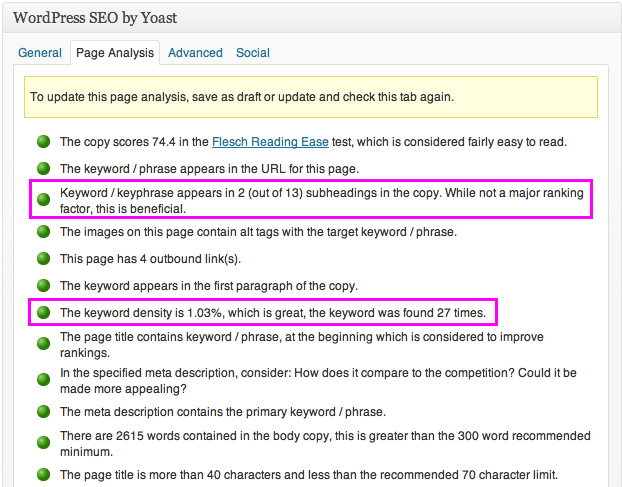
The copy scores 74.4 in the Flesch Reading Ease test, which is considered fairly easy to read.
This is an entry we didn’t have before. A score greater than 70 is
our goal most of the time, as that means middle school reading level.
This is important as our readers may not speak english as their first
language or they may be from another country and be accustomed to
different grammar.
The keyword / phrase appears in the URL for this page.
This was the “slug” from step 1.
This page has 1 outbound link(s).
Outbound links are good — it shows that you play well with others.
The images on this page contain alt tags with the target keyword / phrase.
We’ve used the keyword in our alt tag on our image.
The keyword density is 2.17%, which is great, the keyword was found 7 times.
A keyword density from 1-4% is our goal. So 2% is doing well.
In the specified meta description, consider: How does it compare to the competition? Could it be made more appealing?
We’ve made our meta description long enough, the plug-in is reminding
us that we may want to double-check it before we publish our post.
The meta description contains the primary keyword / phrase.
This is our meta description from step 1.
There are 322 words contained in the body copy, this is greater than the 300 word recommended minimum.
Good work, we’ve written enough content in this tutorial! (It’s our job to make sure it is useful.)
The page title is more than 40 characters and less than the recommended 70 character limit.
Our page title for the tutorial is a good length.
The keyword appears in the first paragraph of the copy.
It is good to make our point up front.
Step 6: Checking Other Keywords
You’ve written your post, periodically checking your SEO as you go by
saving your draft, now it’s time to see if you remembered to include
the other keywords that you are targeting. Go to your plug-in and change
the Focus Keyword to one of your other keywords. Then press Save Draft
in the Publish widget. The plug-in will now update to your new keyword.
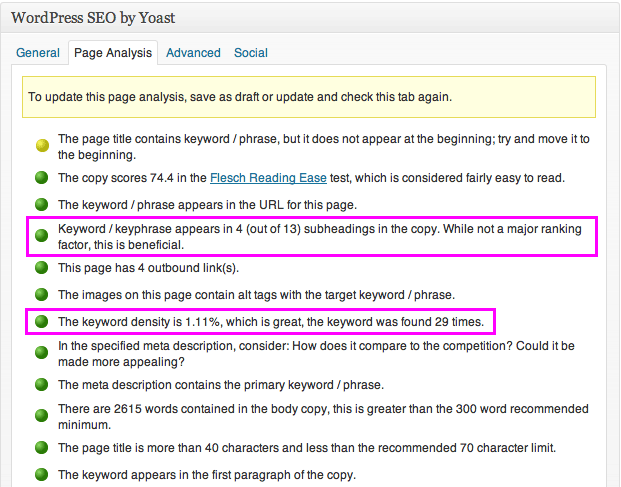
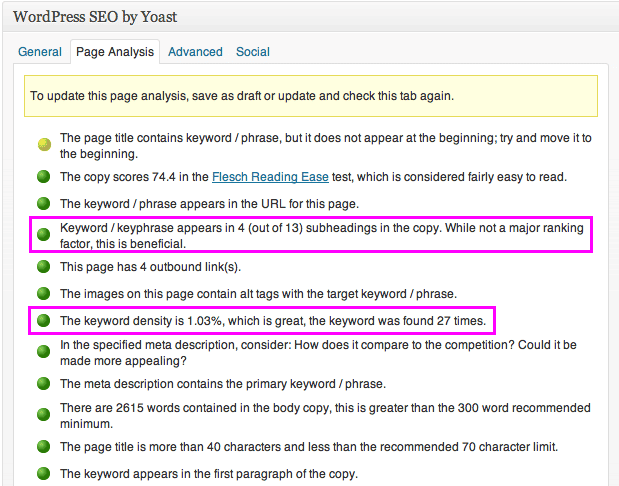
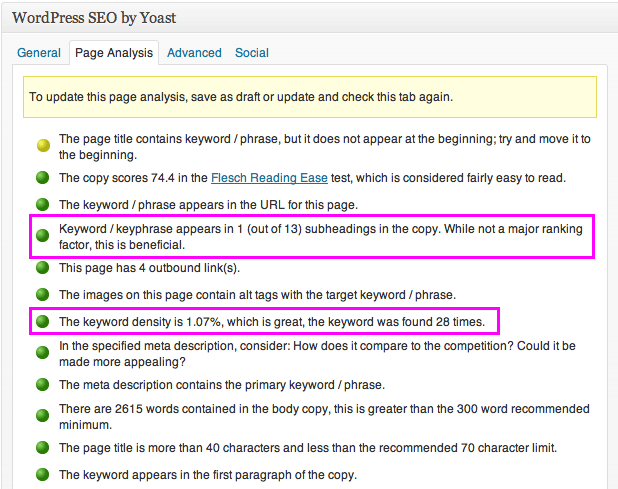
Frequently what will happen is that your keyword density will be a
little low (or possibly even too high). You can usually look back over
the post and find a couple of places where you could add in the keyword
(or remove it if too high). I’ve already tweaked this article, so I will
just show you the screen shots for my 4 keywords.
While reviewing my post I also noticed that I used the keyword
plug-in quite a bit. So I’ve gone ahead and added that to my list of
keywords for the tutorial! This is actually a pretty common occurrence
to find a new keyword or two as you write. In this case, I’ve updated
the WordPress slug to include my new keyword. My new slug is:


.jpg)

